To check your cloud storage usage on WorshipTools and view a detailed breakdown of your stored items, please visit your Account page and select Cloud Storage from the left menu.
On this page, you'll find that your cloud storage includes several types of items. Bibles and Media are managed in Presenter, while song and service attachments are handled in Planning. This article will provide instructions for managing Media in the cloud. For guidance on managing song and service attachments in Planning, please refer to this article: Cloud Storage Management.

*Note: cloud storage is used up by external files that you upload/import into the WorshipTools apps. This can include images and PowerPoints in Presenter, song PDFs in Charts, and sermon notes or other service attachments in Planning. Services, songs, people and Presenter Slides do not count toward your usage.
How to Free up Space in the Cloud
If your cloud storage is running low, you can either upgrade your account to a higher plan or, delete items to free up space.
Deleting items from Presenter
When you delete an item from Presenter, it will also be deleted from the cloud. This is the fastest way to clear up space but you will no longer have access to that file within Presenter. We always recommend that you keep copies of the original media files on your local hard drive.
When viewing the items in your media library you can switch between Thumbnail View and List View using the buttons below the + Import Media button on the right side of Presenter. This is helpful depending on whether you will be deleting one item or several.

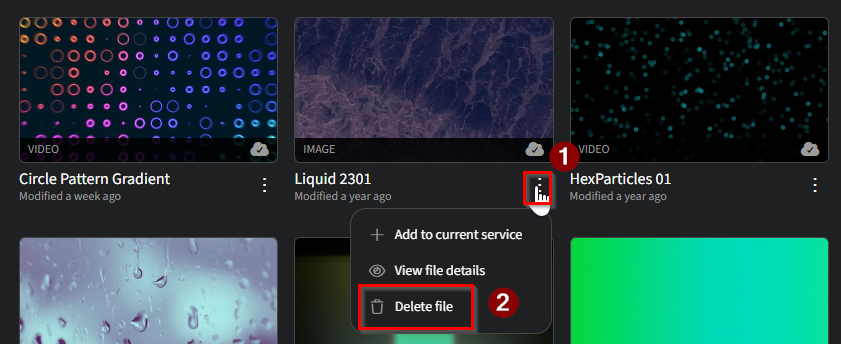
Thumbnail View
The thumbnail view allows only for single items to be deleted at a time. To action this, click the ellipses just below the thumbnail image, select Delete file from the options, then confirm in the pop-up window by clicking Delete to remove the item from the Presenter Library.
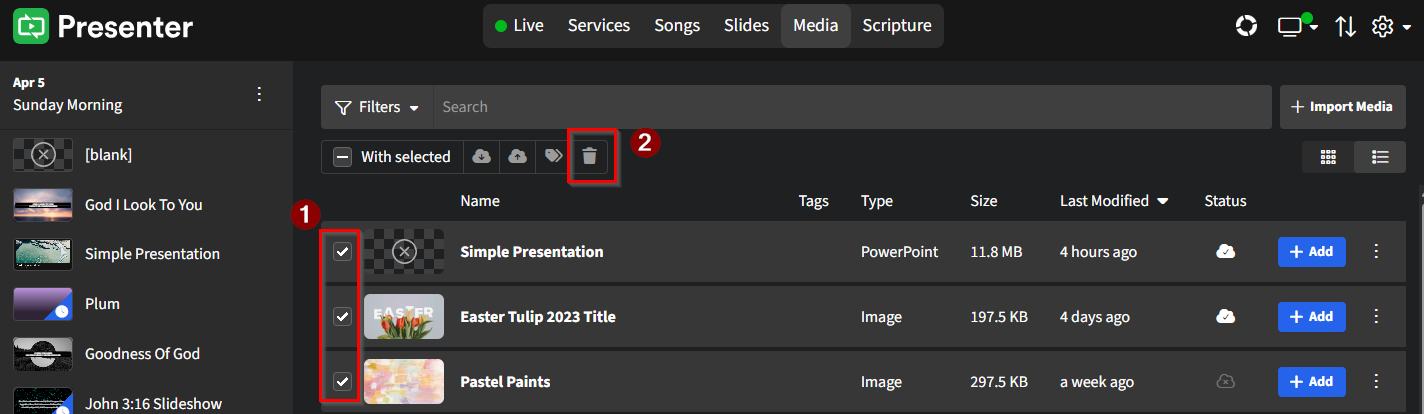
List View
You can delete items in bulk using List View. Select all the items you wish to delete, click the trash can icon at the top of the library panel, then confirm the action in the pop-up window by clicking Delete to remove the selected items from the Presenter library.
Removing Items from the Cloud without Deleting from Presenter
If you want to free up cloud space without deleting the file from Presenter completely, you can remove the item from the cloud. In Thumbnail View, hover your cursor over the image then click View. On the following pop-up window, click Remove on the Cloud line. This will delete the file from the cloud but keep it saved in Presenter on the local computer where it was originally uploaded from.
Auto Sync
By default, Presenter automatically uploads media files to the WorshipTools cloud as soon as they are imported into the Media Library, provided you have a stable internet connection. If you prefer not to have your media files automatically saved to the cloud, you can disable the Auto Sync feature.
Follow these steps to disable the automatic upload in Presenter:
- Click the ⚙ gear icon in the upper right corner > Settings
- Select Media from the left-hand menu
- Uncheck the box for Upload Media
- Click Save at the bottom of the window
After turning off Auto Sync, you will have to manually upload media files, which can help you manage your cloud storage usage more effectively.
Note: Even if media files are not synced to the cloud, they will still sync to other Presenter computers when used in a service.
Here is how to save select media files to the cloud:
- Within Presenter, click on Media to open your Media Library
- Find the file you want to upload and click on the cloud icon appearing in the bottom right corner of the item's thumbnail
- The file will immediately begin to upload to the cloud
- A green pop-up message will display in the bottom right corner of Presenter, confirming the file has loaded to the cloud
Repeat this process for any other media files you want to upload.
To select and sync multiple files at once, switch your library from Thumbnail View to List View. Select all the files you'd like to save (or remove) from the cloud, and click the appropriate button at the top of the library panel.